As the digital landscape evolves, our approach to device management and security must also adapt. Next, we explore a cutting-edge capability within compliance policies in Intune: custom compliance settings.
These settings empower IT administrators to assess various aspects of a device’s configuration and use the findings to determine its compliance status. By leveraging PowerShell scripts within custom compliance settings, administrators can verify a broad spectrum of device attributes, compare results against predefined rules in JSON files, and reinforce compliance policies based on these insights.
Now, let’s take a glimpse into the realm of custom compliance settings:
- Synergy of JSON and PowerShell:
- This innovative approach relies on the synergy between a JSON file and a PowerShell script.
- The PowerShell script acts as a detector, scanning the device for specific configurations.
- The JSON file serves as the rulebook, outlining the desired compliance conditions.
- Seamless Integration:
- Once integrated into a device compliance policy, the results seamlessly coexist with standard compliance settings.
- This harmonious integration extends to influencing Conditional Access decisions, similar to traditional compliance settings.
The script compresses discovered values into a single-line JSON format. In below example, it captures the current BIOS version.
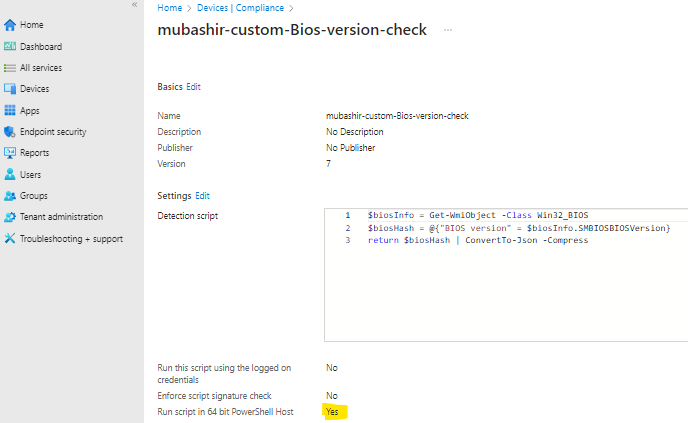
$biosInfo = Get-WmiObject -Class Win32_BIOS
$biosHash = @{"BIOS version" = $biosInfo.SMBIOSBIOSVersion}
return $biosHash | ConvertTo-Json -Compress
After creating the PowerShell script, upload it to Microsoft Intune. This allows you to create a device compliance policy that verifies the custom compliance settings.

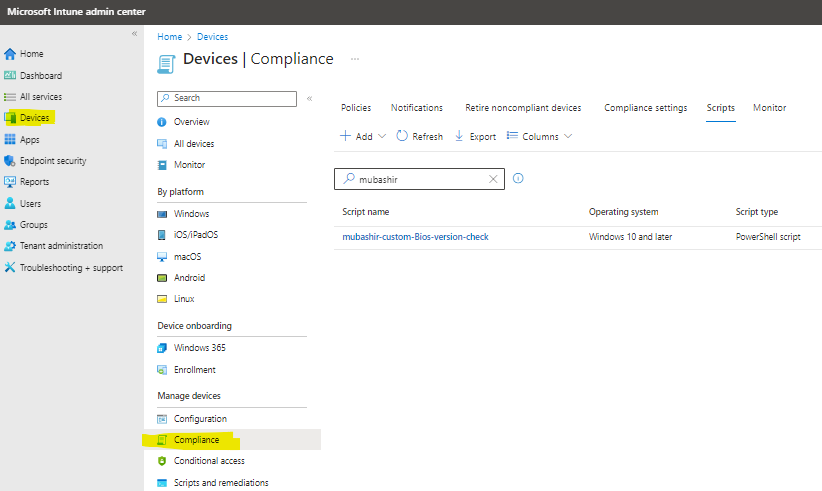
- Launch the Microsoft Endpoint Manager admin centre portal and navigate to Endpoint security > Device compliance > Scripts.
- On the Compliance Policies | Scripts page, click “Add > Windows 10 and later.”
- On the Basics page, furnish essential details such as Name, Description (optional), and Publisher, and proceed to the next step.
- Detection script: Copy and paste the meticulously crafted PowerShell script.
- Run this script using the logged-on credentials: Opt for “No” to execute the PowerShell script in the SYSTEM context.
- Enforce script signature check: Opt for “No” to bypass signature verification.
- Run the script in a 64-bit PowerShell Host: Opt for “Yes” to execute the script in a 64-bit PowerShell host.
- On the Review + create page, validate the script configuration and finalize by clicking “Create.”

The next step is to create a JSON file that defines the settings for verification by the device compliance policy, including acceptable values.
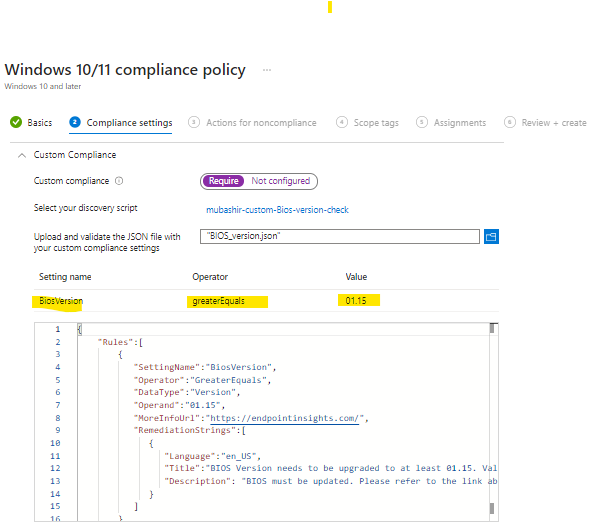
- SettingName: Denotes the name of the custom compliance setting, as yielded by the PowerShell script.
- Operator: Specifies the action for the compliance rule (IsEquals, NotEquals, GreaterThan, GreaterEquals, LessThan, LessEquals).
- DataType: Identifies the type of data (Boolean, Int64, Double, String, DateTime, Version) returned by the PowerShell script.
- Operand: Lists the values targeted by the operator.
- MoreInfoURL: Provides a URL offering additional insight into the custom compliance setting.
- RemediationStrings: Furnishes information about noncompliance, offering guidance for rectification.
Here is an example of JSON file used
{
    "Rules":[
        {
           "SettingName":"BiosVersion",
           "Operator":"GreaterEquals",
           "DataType":"Version",
           "Operand":"01.15",
           "MoreInfoUrl":"https://endpointinsights.com/",
           "RemediationStrings":[
              {
                 "Language":"en_US",
                 "Title":"BIOS Version needs to be upgraded to at least 01.15. Value discovered was {ActualValue}.",
                 "Description": "BIOS must be updated. Please refer to the link above"
              }
           ]
        }
     ]
    }
Crafting a Device Compliance Policy with Custom Settings Now, let’s put theory into action by crafting a device compliance policy. This policy is instrumental in assessing device compliance with the organization’s stipulated criteria.
Certainly! Let’s put theory into action by crafting a device compliance policy. This policy plays a crucial role in evaluating whether devices meet the organization’s specified criteria. The compliance status, in turn, feeds into reporting mechanisms and, crucially, influences Conditional Access decisions. Here are the nine steps to create a device compliance policy that prominently features a custom compliance setting:
- Navigate to Intune Portal: Access the Microsoft Intune portal or the Endpoint Manager console.
- Create a New Policy: Start creating a new device compliance policy.
- Custom Compliance Settings: Within the policy, focus on the custom compliance settings section.
- Add Custom Settings: Add the specific custom compliance settings you want to evaluate. These settings will be based on your organization’s needs.
- Upload PowerShell Script: Upload the PowerShell script you’ve made earlier. This script will detect relevant device attributes.
- Test and Deploy: Test the policy on a subset of devices, ensure it aligns with your organization’s requirements, and then deploy it to the broader device fleet.
- On the Actions for noncompliance page, maintain the default configuration (Action on Mark device non-compliant with Schedule set to “Immediately”) and proceed.
- On the Scope tags page, configure the relevant scope tags and proceed.
- On the Assignments page, define the target group for the policy and continue.
- On the Review + create page, verify the policy configuration and confirm creation.

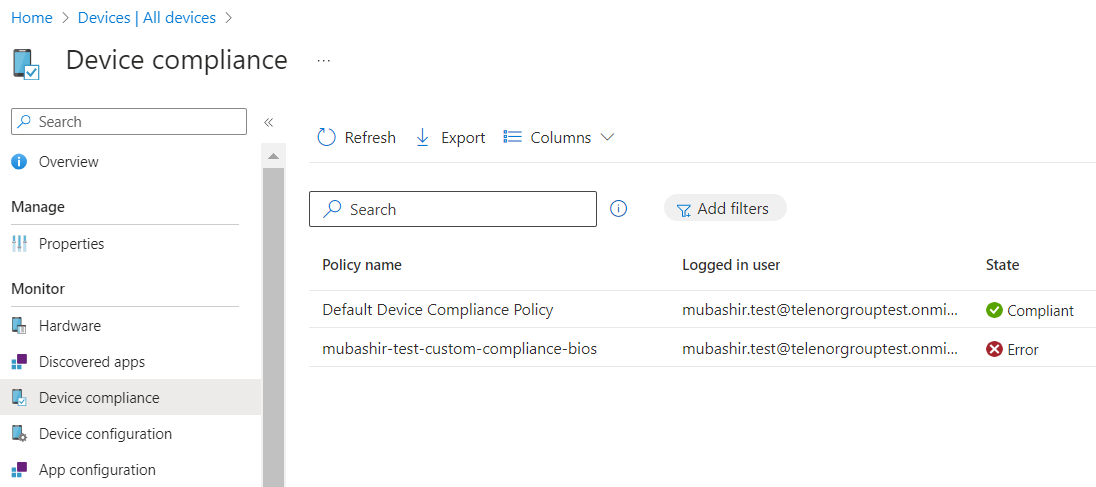
As we wrap up our exploration of custom compliance settings, let’s take a quick look at their real-world impact. Image below provides a visual representation of the BIOS version custom compliance setting we discussed earlier. This illustration demonstrates how this integration aligns with device compliance.


