Microsoft Defender for Endpoint simplifies security management for devices beyond Microsoft Endpoint Manager (MEM) enrolment. It acts as a guardian, enforcing and reporting policies assigned via MEM. Devices integrated into Azure Active Directory (Azure AD) become part of the MEM, Azure AD, and Microsoft 365 Defender ecosystems.
Steps to configure MDE
- Configuring the Tenant for Security Management with Microsoft Defender for Endpoint
- Onboarding Devices in Microsoft Defender for Endpoint
- Tagging Devices for Security Management (a prerequisite during preview)
- Grouping Devices based on Security Management for Microsoft Defender for Endpoint
- Assigning Policies for Security Management
To enable Security Management for Microsoft Defender for Endpoint, configure your tenant. This ensures seamless security settings management within MEM, managed by MDE. The configuration involves two core integrations between MEM and MDE
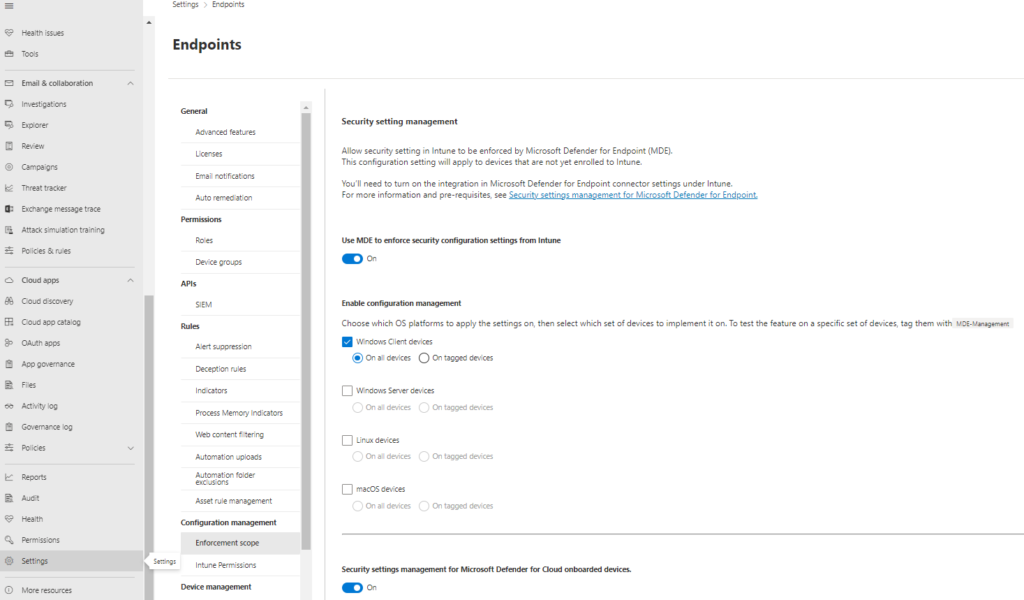
Configuration 1: Enabling Security Setting Management in Microsoft 365 Defender
- Access the Microsoft 365 Defender portal and navigate to Settings > Endpoints > Enforcement scope.
- On the “Enable security setting management“, navigate to the OS platform, switch the sliders for Windows Client devices and Windows Server devices to “On,” and save the configuration.
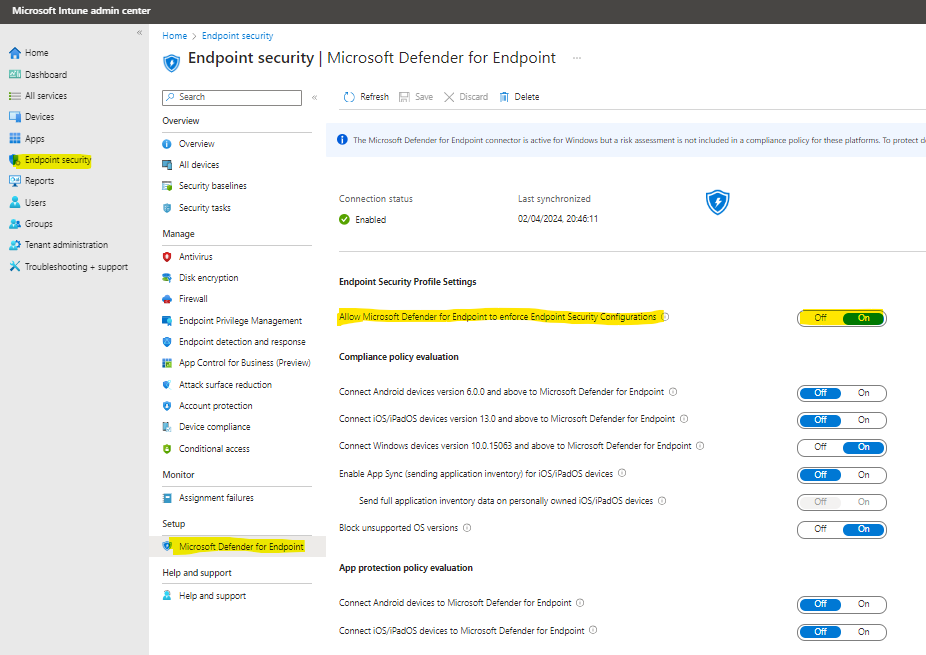
Configuration 2: Allowing Microsoft Defender for Endpoint to Enforce Endpoint Security Configurations in Microsoft Endpoint Manager Admin Center
Launch the Microsoft Endpoint Manager admin center portal and navigate to Endpoint security > Microsoft Defender for Endpoint.
- On the “Endpoint security | Microsoft Defender for Endpoint” blade (see Figure 2), enable the option “Allow Microsoft Defender for Endpoint to enforce Endpoint Security Configurations” by switching the slider to “On.”
Onboarding Devices in Microsoft Defender for Endpoint
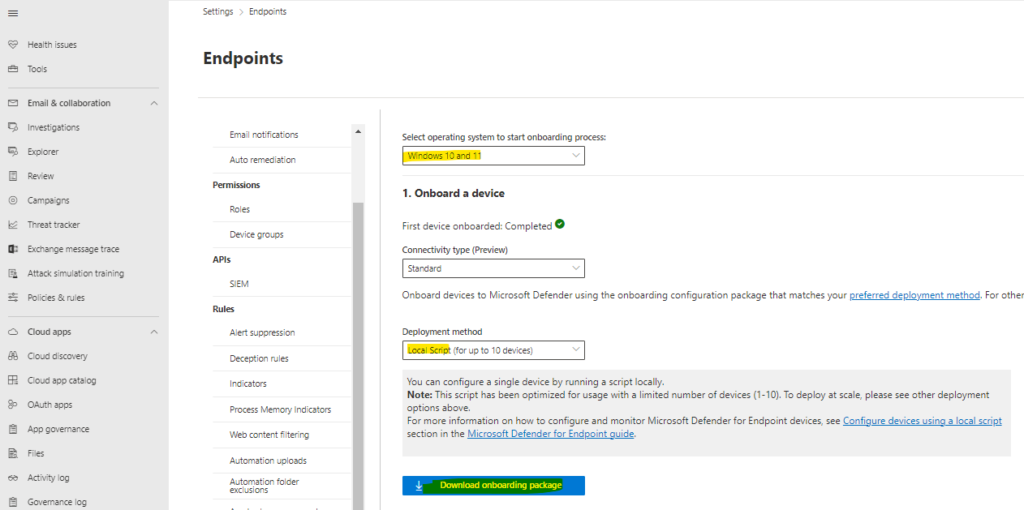
Next, onboard Windows devices into MDE using methods aligned with your requirements. Follow these steps for process selection and deployment.
- Access the Microsoft 365 Defender portal and navigate to Settings > Endpoints > Onboarding.
- On the “Onboarding” page, select the target operating system and deployment method, and proceed to download the onboarding package.
Tagging Devices for Security Management (Required during Preview)
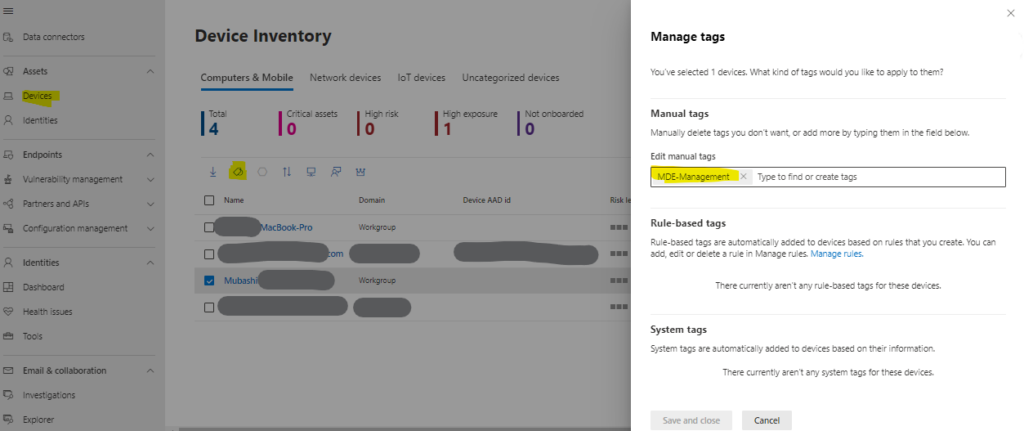
Tag devices on-boarded in MDE with the MDE-Management tag. This tag helps enrol devices into the Security Management for Microsoft Defender for Endpoint configuration channel, enabling automatic Azure AD enrolment. These tagged devices are then used for grouping and targeting purposes.
- Navigate to the Microsoft 365 Defender portal and access the Device inventory.
- Select the onboarded device, click “Manage tags,” and add the “MDE-Management” tag.
Grouping Devices based on Security Management for Microsoft Defender for Endpoint
Efficient device management hinges on structured grouping. To this end, devices are categorised based on the Security Management for Microsoft Defender for Endpoint configuration channel.
This grouping facilitates the seamless assignment of endpoint security policies to specific devices. Here’s how it’s done:
- Launch the Microsoft Endpoint Manager admin centre portal and navigate to Groups.
- On the “Groups | All groups” page, create a new group and specify the essential information.
- Select “Dynamic device” as the membership type and set up dynamic membership rules based on the rule syntax.
(device.managementType -eq “MicrosoftSense”)Assigning Policies for Security Management
The final step is to create and assign security policies for endpoints using the Microsoft Defender for Endpoint. Available policies include Antivirus, Firewall, Firewall Rules, and Endpoint Detection and Response. Here’s the guide to policy creation and assignment.
- Access the Microsoft Endpoint Manager admin center portal and navigate to Endpoint security.
- Select one of the available endpoint security policies for the Security Management for Microsoft Defender for the Endpoint channel.
- Configure the policy based on your requirements
- Assign the policy to dynamic device group created above.
Once policy is pushed, device will start reporting to Defender for endpoint. In order to run detection test use following code provided by Microsoft. Run this test in command prompt window.
powershell.exe -NoExit -ExecutionPolicy Bypass -WindowStyle Hidden $ErrorActionPreference= 'silentlycontinue';(New-Object System.Net.WebClient).DownloadFile('http://127.0.0.1/1.exe', 'C:\\test-WDATP-test\\invoice.exe');Start-Process 'C:\\test-WDATP-test\\invoice.exe'Further go to devices in Defender security portal and devices.


